Lol How Do You Tell When Red or Blue Buff Is Coming
This article is brought to you by Gamer Sensei. It doesn't have to be a grind with the right coaching. Check out Gamer Sensei for a personal League coach of your own.

Understanding the Summoner's Rift jungle is one of the most invaluable tools that any League of Legends player can have in their arsenal. Not only is it useful for aspiring jungle mains, but it's also crucial for every other role to know as well.
If you can predict the enemy jungler's movements, you can avoid game-changing ganks that end in tragedy. Or better yet, and for more practiced players, you can even set up traps and rotations designed to catch the enemy jungler at specific camps to turn the tide in your team's favor.
Likewise, as a jungler, moving around the map and clearing camps in a specific way allows you to maximise how quickly and how often you can gank, and oftentimes, the jungler is responsible for controlling the pace of the game and setting up the big plays. The jungler with the most impact on their team is the jungler that wins the most.
The first step to all of this is understanding proper pathing and routing through the jungle.
What is jungle pathing?
As difficult as it sounds to predict an enemy jungler's movements or pull off tricks to get ahead as a jungler against the enemy, it's actually a very simple concept. Jungle pathing, or jungle routing, simply means the paths that a jungler chooses to take. It dictates the order in which they clear camps and the directions they take to get to those camps.
There are numerous factors that weigh into why a jungler goes where they go, and "predicting" where they'll be is as easy as learning what those factors are and understanding that the enemy jungler will probably follow them. As such, you can always attempt to throw off the enemy team as a jungler by taking more spontaneous paths, but you run the risk of slowing your clear speed, and, therefore, potentially lowering your impact on the game.
Likewise, if the enemy knows where you'll be and attempts to thwart you when you try to take a camp as a jungler, your best defense will be map awareness, as in knowing exactly when an enemy laner goes missing and how long it's been since you've had vision of them, and respecting your own strength in fights.
In this guide to jungle pathing and routing, we'll dive into some of the more common paths shared by most of the game's junglers at the start of each game, followed by a deeper look into special paths used by other specific champions that have kits that allow them to do so.
The common paths
Stage one: Blue side standard path A
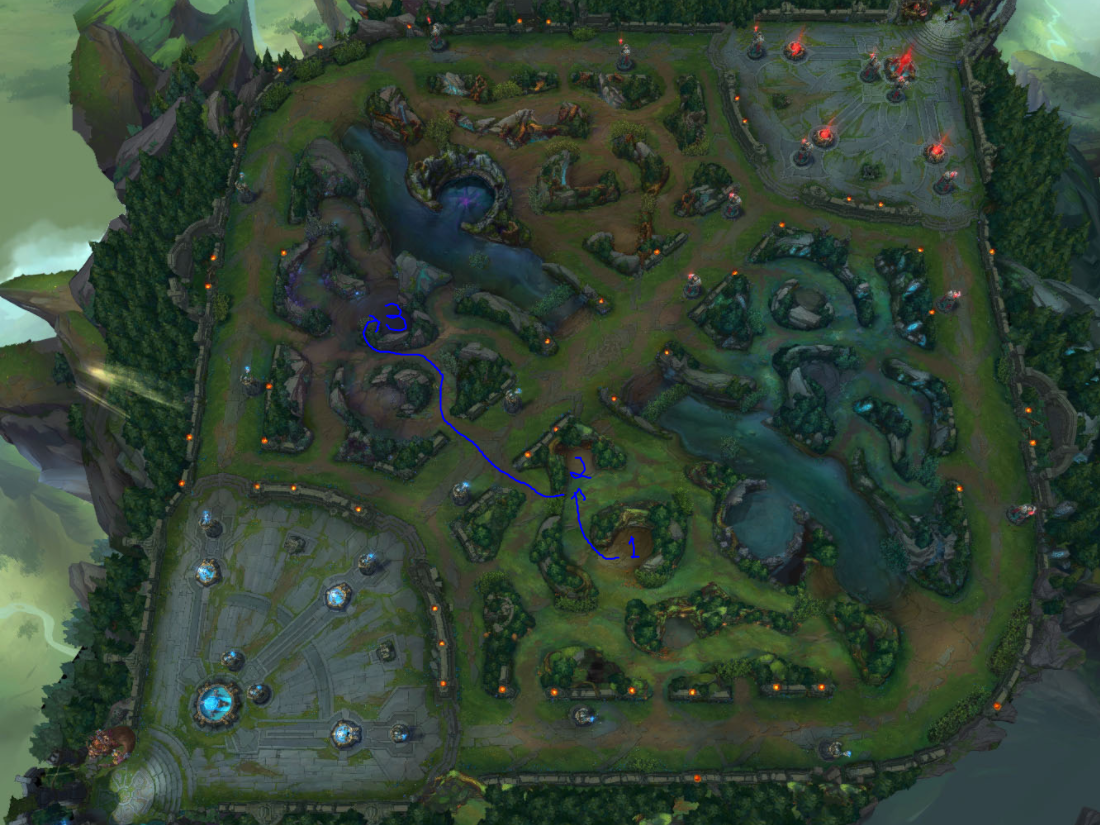
When you start on the blue side as a standard jungler, like Jarvan IV, Sett, and Lee Sin, you'll want to start with your Red Brambleback, otherwise known as the "red buff." This will instantly put you at level two, and the red buff by the buff itself will make clearing the rest of your jungle slightly easier. The next camp is determined by which champion you're playing and which playstyle you want to go for.
If you have any semi-reliable AoE at your disposal, like Sejuani's W, Zac's W, or Karthus's Q, you'll want to move onto your Raptor camp. The Raptor camp provides a lot of gold and experience, and since it's much faster to clear it than Krugs, it's one of the most valuable camps in the game behind the buffs.
Typically, it's one of the more difficult ones to kill thanks to the camp's high damage, but if your champion is partially reliant on AoE to clear camps, chances are you also took the Talisman starting jungle item, and you'll get enough health back from the item's passive to justify taking this camp second. Next, you'll move onto your Blue Sentinel, or the "blue buff." After you finish your second buff, you've now completed the first stage of your jungle path.
If you lack semi-reliable AoE, you can take the Wolves camp with champions like Kha'Zix, Lee Sin, or Elise. That will take as much time as AoE clearing champions that take the Raptors camp. It'll also provide almost equal gold and experience, giving you a clear path to level three after your next jungle camp.
TL;DR: Red buff > Raptors/Wolves > Blue buff
Stage one: Blue side standard path B

On the other hand, you may be playing a champion with much stronger single-target damage than AoE, like Kha'Zix, Lee Sin, Elise. In that case, you should have taken the Hunter's Machete item over the Talisman, and that will boost your single-target camp clear by providing you with lifesteal toward jungle monsters.
With these champions, you still start with the Red Brambleback, but you'll want to skip straight over to your Blue Sentinel, and then finish the first stage of this jungle path by clearing your Gromp. The Gromp is very tanky and can take a little while to kill, but it's only one monster, so with a strong single-target champion, you'll find that it's much easier to kill than any Raptors or even Wolves. R
emember, when facing the Gromp, its first and second attacks are far stronger than any of its attacks thereafter, so blocking them with some sort of heal, shield, or crowd control goes a long way. If you're playing Lee Sin, safeguard yourself first. If you're playing Elise, use your spiderlings to tank that damage. Use your champion's kit at your disposal to soak damage.
You may also choose to take Gromp before Blue Sentinel. The difference in timing is negligible, but beware that you can get invaded and lose your Blue Buff in this case. If you take Blue Buff first, you won't run into this risk.
TL;DR: Red buff > Blue buff/Gromp > Gromp/Blue Buff
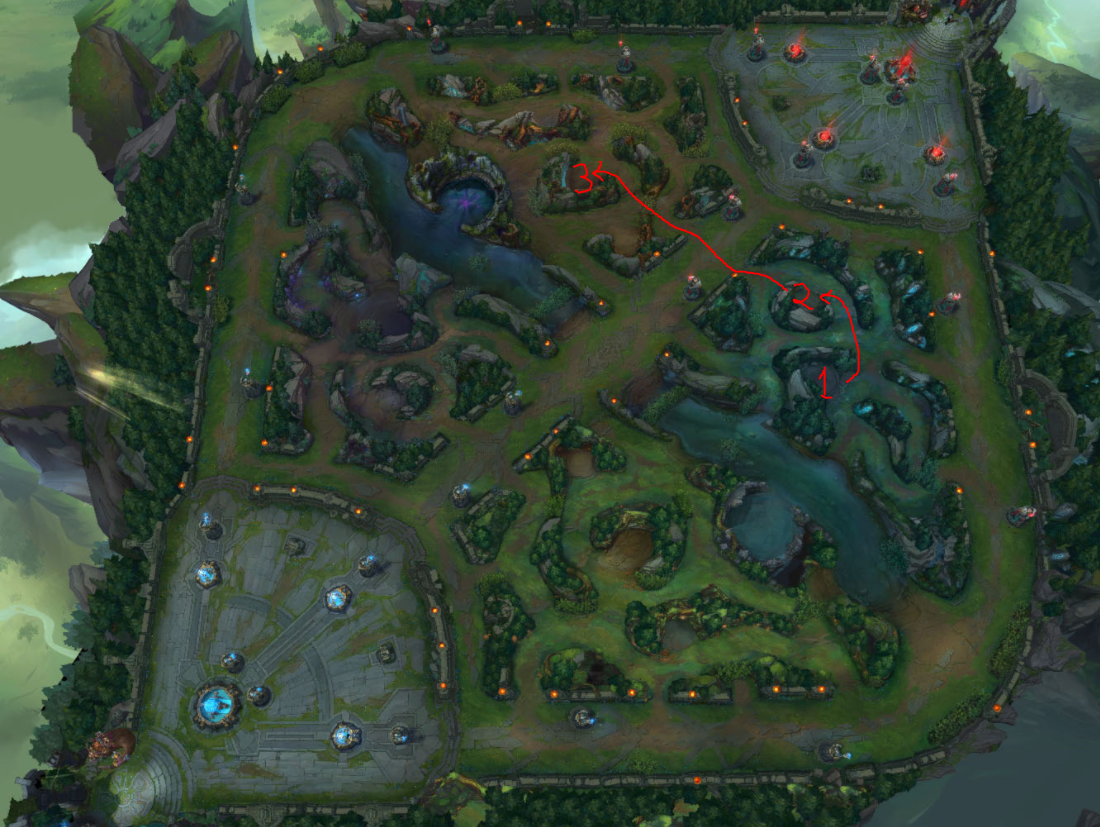
Stage one: Red side standard path A

For the standard paths on the red side, you'll essentially just do the reverse as you would on the blue side. For instance, if you're playing a tank or mage jungler that has decent waveclear but terrible single-target damage, you'll start with the Blue Sentinel, move across the lane to the Raptors or Wolves, and then take your red buff.
Occasionally, you'll play against a rather rowdy enemy jungler like Shaco or Rengar who likes invading your side of the map as early as possible. To prevent a sneak attack when you're at your most vulnerable, place a ward in the bush next to the red buff before actually attacking your Raptors, and then move back to continue your jungle path, business as usual.
Another option to avoid an invade is to ask your bottom or top laner to "fake-leash," inducing your opponent in confusion while you do the buff you want. If you're playing a non-intensive mana champion, you can begin Red Buff as well.
TL;DR: Blue/Red buff > Raptors > Red/Blue buff
Stage one: Red side standard path B
We're sure you're smart enough to realize what we're about to tell you, but we'll explain it again anyway. Simply reverse what you would have done as a single-target damage dealing jungler. Start with your Blue Sentinel, move onto your Gromp, and then trot across the lane to your Red Brambleback. This maximizes your damage by pitting you against strictly single-target monsters.
It's also very possible to move into the Wolves camp from your Sentinel, rather than Gromp, because it could shave a few seconds off your clear. Also similar to path A on the blue side, make sure to ward the red side of the jungle when you enter it to prevent invades, even if, as a single-target jungler, you'll probably fair better in a duel against a Shaco than an AoE tank could at early levels. It's still better to be safe than sorry.
Remember to apply the same tip as in the previous point. If you're playing against a jungler who likes to invade, ask your opposing laner to "fake-leash" so that your opponent will think that you started on the other buff.
TL;DR: Blue/Red buff > Gromp/Wolves > Red/Blue buff
Stage two: Early gank
After finishing the first stage of your standard jungle path, you'll find yourself in between the mid and top lanes wondering where to go and what to do next. Don't worry, because there's really only three simple options. As for laners, the jungler usually begins this stage at around three minutes into the game or slightly before, so prepare your lanes with wards before pushing up any further.
In some cases, when playing against champions such as Shaco, Twitch, or other aggressive, early-game junglers, be prepared to get ganked while you're still level one.
Option one: Look for a gank
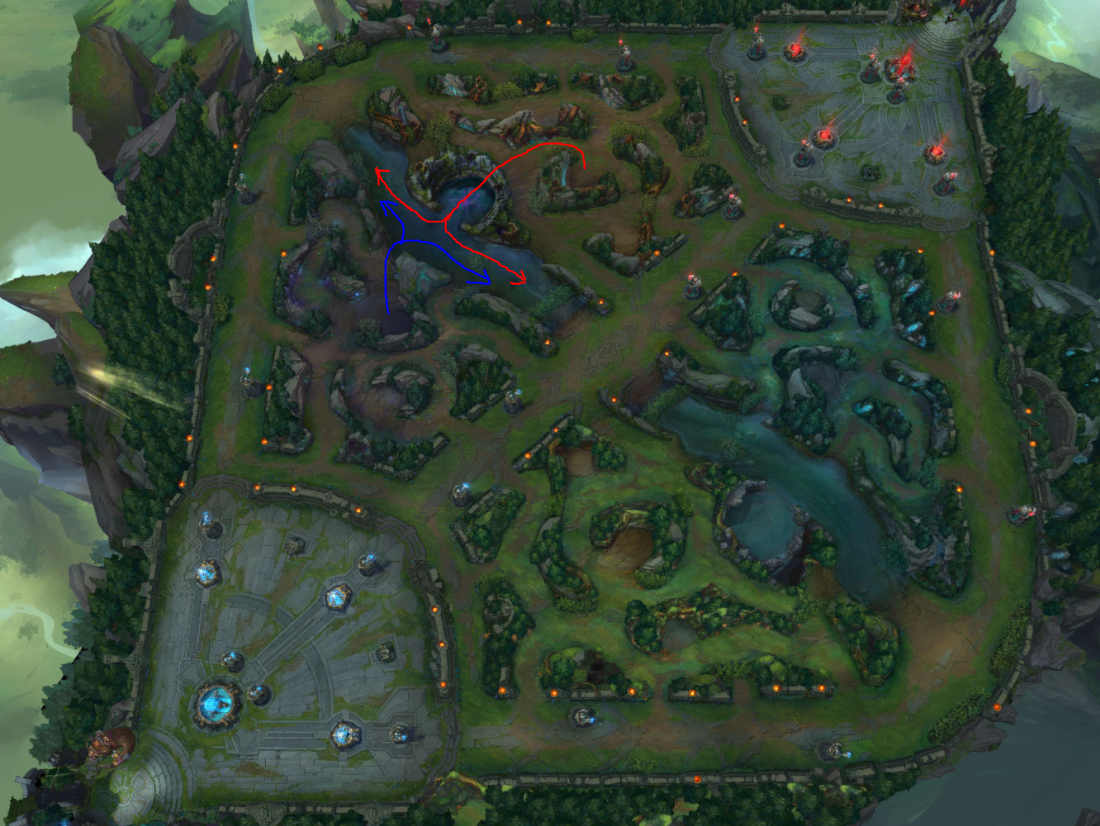
The first option is to gank a lane. Walk out into the top side river and take a glance at both your top and mid lanes. Is one of your allies pushed up hard enough to make for a safe gank? No? Move onto option two. If they're pushed back, and the enemy laner is exposed, move in. It's as simple as that.
If you pull off a successful gank, you can go farm your jungle some more, recall, help shove the lane or even gank again. Typically, ganking again won't work, because the enemy laner will probably ward to prepare for you almost immediately upon returning to lane. There is a small chance, however, that you can do a repeat gank to set them extremely behind your ally. If you have careful vision of them when they return, and you're sure they didn't place wards, and they are somehow still pushed far up in the lane, walk right into the lane and mess with them a little more.
This typically only works if the enemy laner has Teleport, and they are able to get back to the lane before the minions push back toward them. Players usually teleport instantly back to lane after being killed to not lose too much experience, so this might work in your favor if they didn't have wards in the first place.
Option two: Kill Scuttle, look for a gank
The second option is to clear the Scuttle Crab, and then gank a lane. There are two reasons you'd move to clear the Scuttle Crab before ganking a lane. First and foremost, if your jungle clear during stage one didn't go quite as planned, or you're on a particularly weak early game jungler, you may have too little health to gank without getting killed yourself. Taking the time to kill the crab will give your red buff time to regen some health. That, paired with the health return from either starting jungle item and Smite, if it's available, should be enough to get you health again.
The second reason you'd kill the Scuttle Crab before ganking would simply be because neither of your lanes are quite ready for you to gank, but they will be soon, and they just need a little extra time. Remember, if a lane isn't quite ready to gank, the worst possible thing for you to do is just sit still and wait for the opportunity. You always want to be doing something in order to keep up in gold and experience to the enemy jungler, and the Scuttle Crab provides you with that very easily after stage one.
The Scuttle Crab also provides vision for both you and your teammates, giving you more time to adapt to the enemy jungler or enemy lanes' roaming potential.
Option three: Full clear
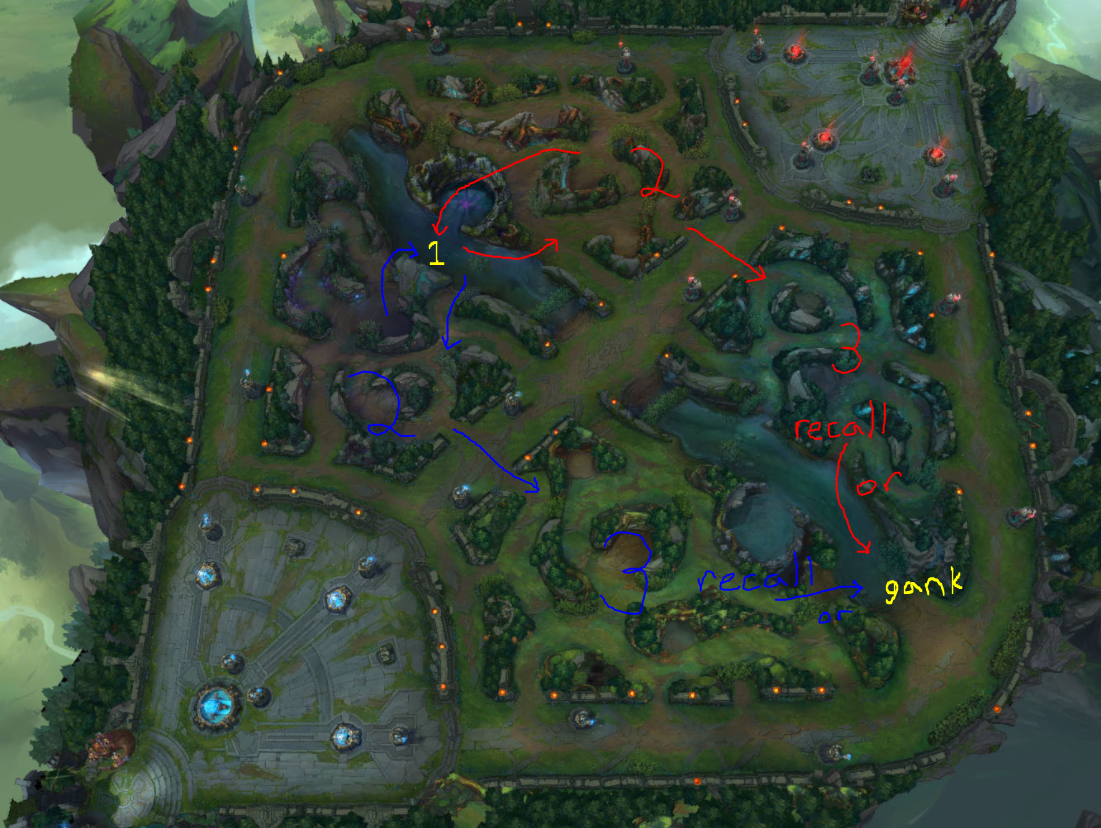
This stage doesn't often happen, but if you're still too low health after taking Scuttle Crab or both your top and mid laners pushed insanely hard and are looking very difficult to gank, you do have the option to go back into your jungle and clear the rest of the camps before recalling or attempting your first gank.
This option is almost never the best choice for one big reason. Even if neither of your solo lanes look ripe for a gank, they may be extra gankable for the enemy jungler, providing you with the perfect opportunity to lay a trap or prepare a counterattack. For example, if your top laner pushes in extremely hard on the opposing top laner, the enemy jungler will probably look to gank that lane first. If you're there and ready, you can catch them off guard, and it might just turn out even better than a regular old gank.
If, perhaps, the enemy jungler was just seen ganking somewhere else, or a deep early ward caught them on the other side of the map and neither of your lanes are suitable to gank, you can clear the rest of your jungle, starting on the side you're on.
Remember, if you choose this option, always look for a lane to gank in the meantime, and prioritize your Krugs camp last as it's difficult to kill and takes the most time.
You can also recall to get a Control Ward and your next jungle item if you're too low to even clear your jungle. There's no shame in running away as long as it's the right call. It's better to get health back sometimes instead of risking dying to a jungle camp.
Stage three: After your first recall and into the midgame
This is where things get weird, mostly because there are far more considerations into deciding where to go in this stage, and therefore it will be harder to predict as a laner. Fortunately, there are some general rules of thumb to make your life a little easier.
If you ganked right away after the first stage of your jungle path, one of two things will happen. The gank may have worked out, and you have the gold for a big item. If you got the kill, you'll probably be able to buy a Fiendish Codex or a Bami's Cinder. If it was first blood, you might even be close to picking up a full Caulfield's Warhammer on your first back, which is a massive damage spike for so early in the game. If your ally got the kill, you probably have enough for at least the first upgrade on your jungle item.
In either scenario, recalling isn't a terrible idea so you can get the items needed to jungle more efficiently.
If the gank went awry, and you're either super low on health or, you know, dead, you'll want to recall as well. Well, obviously, if you're dead, you'll already be in base, so problem solved.
On the contrary, if the gank was mostly uneventful, you can either look for another gank or to clear more of your jungle, since you won't have much gold at all. If you want to gank, your first option is mid lane if you ganked top first, and top lane if you ganked mid. If that lane isn't prepared for a gank, then head into your jungle to clear your remaining camps.
When clearing, you'll be working your way to the other side of the map from where you're standing, which usually means you'll be working your way from top side to bottom side. In between each and every camp, look for another safe gank, and if there isn't a good ganking opportunity between the end of stage two and when you finish clearing your camp, drop some wards near the river for your teammates to track the enemy jungler, and recall. It's very unlikely that you won't have a chance to gank before finishing your clear or even to counter gank the enemy. If you do gank, it's usually best to recall for the first time then.
Stage four: Midgame and into late game
For the remainder of the game, this will essentially be your plan of attack. Move through your camps while looking for ganks, and never wait near a lane for too long for it to open up for a gank without either clearing a camp for gold or recalling for an item. Always stay active.
The camps that you'll want to prioritize, in order, are your buffs, Raptors, and Wolves. If a large objective is spawning soon, like Dragon or Rift Herald, you'll want to try to clear camps and prepare ganks on that side of the map to make sure you're ready to move. Dragons are always more important than Rift Herald. The recently-added Dragon Soul effect is extremely valuable and teams prioritize every drake to get closer to the Dragon Soul. The same goes for a tower. If a tower is low anywhere on the map, constantly look to gank that lane to push it over the edge. This will free up that lane and open more opportunities in the future for other ganks.
Keep an eye on your enemy's side of the jungle, too. If your red buff is spawning, there's a good chance that their blue buff is spawning, which means they're probably on that side of the map. Warn your laners if that's the case, because they'll want to prepare for a countergank. Likewise, if you know your enemy's buff is spawning, and you see them gank the opposite side of the map, you probably have a great opening to swipe their buff and get a lead in experience or gold.
When the late game rolls around, farming the jungle becomes slightly more mundane, similarly to how a laner's farming becomes less important around the same time. Typically, junglers are playmakers—even the assassins. Control your jungle with wards, and get ready to control the pace of each fight with your positioning and knowledge of the enemy jungler's positioning.
Leave most camps to your carries so that they can get their power spike or defensive items faster.
The unique paths
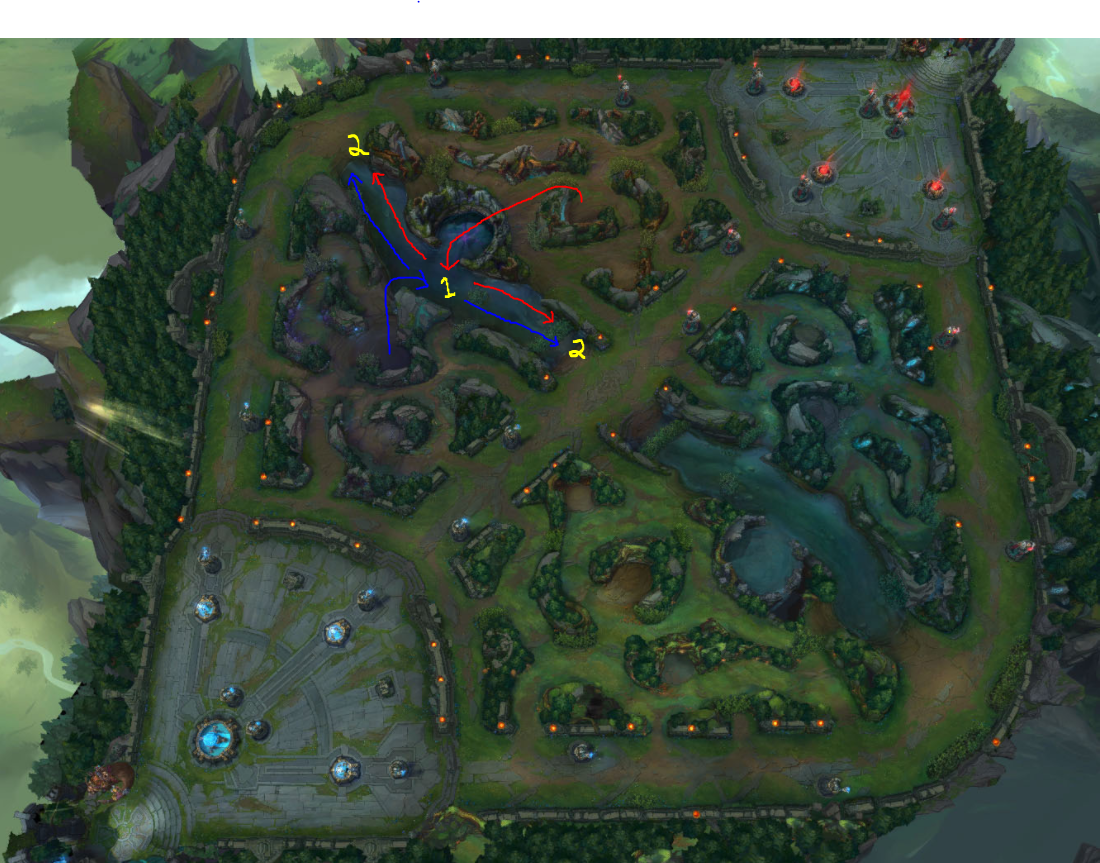
High AoE champions
There are few champions in the game that have such extraordinary early game AoE damage that they can actually begin with the Raptor camp. Champions that fall under this category are Kayn, Evelynn, and Shyvana. There are several benefits to this strategy, if you're on the right type of champion.
Firstly, it requires significantly less help to clear. Thanks to the extremely low health of the small Raptors, your mid laner only had to basic attack a couple of them before your AoE damage cleaves through all of them, which is vastly different than the amount of time your bot lane would have spent helping you on the buff. This frees up your bot lane to prepare their lane faster, and your mid laner should finish leashing you so quickly that they make it to their lane before the minions even get there.
The second benefit is simply that you'll then be level two when you try to clear your first buff. This means you'll have more health and a low more damage, which also means you'll take less damage, which is very straightforward.
After you finish your birds, clear the nearest buff, head across the lane to the next, and then move into stage two. If you deploy this strategy from the red side of the map, you'll be able to prepare a gank for bot lane, rather than the top lane, when you reach stage two, because you'll be on that side of the map. Supports rarely ward this early in the game, allowing you to catch them off guard and get your bot lane snowballing very early. A snowballed bot lane is hard to beat for one simple reason—it gets two-fifths of your team ahead in one fell swoop, rather than just one.
This means, as a support or ADC player, you want to be extra weary of champions with high AoE damage when your team is stationed on the blue side of the map. That means you want to avoid pushing your lane, and make sure to ward your river bushes before it's too late.
Level two invade
This strategy is reserved for champions with extremely high-damage early games, like Lee Sin, Rengar, Shaco, Elise, or Graves.
What you'll want to do is start the game on the opposite side that you normally would. For example, if you're on the blue side, start with your Blue Sentinel. If your team is on the red side, start with your Red Brambleback. After you clear it, head across the river toward your enemy's second buff. You'll know what their starting buff is by using the strategies listed in stage one of this guide. Remember to analyze if a fake-leash happened by looking at the positioning of the bottom and top laner.
After getting into the enemy jungle, you have two options. Either you can wait in the bush nearest their next buff for them to start fighting it, and then attack them, or you can just swipe the buff and leave. This strategy has the potential to severely cripple your enemy jungler, but it's also very risky.
For starters, it's very rare for the enemy team to be completely unprepared for this, especially at high elo where invades are much more common. One good trinket placement, one step out of a bush, or even if the enemy jungler follows a slightly different path than you expect can mess the strategy up completely or waste your time. This is a very "feast or famine" type of strategy, because it either works really well, or goes horribly wrong.
Most junglers have adapted to this tactic by buying a yellow trinket ward, placing it in the river, then going back and getting the red trinket ward before the first buff even spawns.
Alternatively, you can even gank a lane at level two, but you pretty much need to have your red buff for the extra damage and crowd control, because your effectiveness at that low of a level isn't fantastic unless you're Lee Sin, Jarvan, or a few other champions.
The early dragon
There are a few champions that can actually kill the dragon extremely early in the game. Typically, you'll need to be at least level three, have red buff if possible, and have at least one upgrade on your jungle item. With those circumstances met, you can solo kill the dragon as a small number of champions. This shouldn't stop you from attempting it, though, especially if you have recently ganked the mid or bottom lane and have some time before they get back to their lanes.
blizzardstrajamoned.blogspot.com
Source: https://dotesports.com/league-of-legends/news/league-of-legends-jungle-pathing-routing-guide-20608
Publicar un comentario for "Lol How Do You Tell When Red or Blue Buff Is Coming"